
Every tool we run eventually wants a bearer token. kubectl needs one to talk to a cluster behind our identity provider. frpc needs one to open a tunnel. Internal scripts calling our own APIs with curl need one. CI jobs need one to authenticate as a workload rather than a person.
Each of these tools has its own idea of how authentication should work, if it has one at all. Wiring each one up separately means repeating the same work in slightly different ways: run the OIDC flow, cache the token so you are not logging in on every call, refresh it before it expires, and store it sensibly.
That is one problem, worth solving once, in one place. So we built oidc-token-cli, a single binary that runs the OIDC flow, and everything else just asks it for a token.
🔑 Zero-config OIDC/OAuth2 token helper for CLIs and CI; bare token on stdout, auto grant selection, cached & refreshed.
What it looks like in practice
The tool is a single command. You give it the issuer, a client ID, the scopes you want, and optionally an audience:
oidc-token \ --issuer https://id.example.com/ \ --client-id my-public-client \ --scope "openid offline_access" \ --audience my-apiOn the first run, it opens a browser to your identity provider’s login page, or if there is no browser to open, it prints a device code and a URL to visit on another device. Either way, once you approve the login, the CLI writes the token to stdout and caches it locally.
Every run after that is silent. If the cached token is still valid, it is returned immediately. If it has expired but there is a refresh token, the CLI refreshes it in the background and returns the new access token. You only see a browser or a device code again if the refresh token itself has expired or been revoked.
That is the whole point: kubectl calls oidc-token through its exec credential plugin, and frpc execs it the same way to obtain its token. Neither of them knows or cares what OIDC is. They just get a token when they ask for one.
Why not just script it per tool
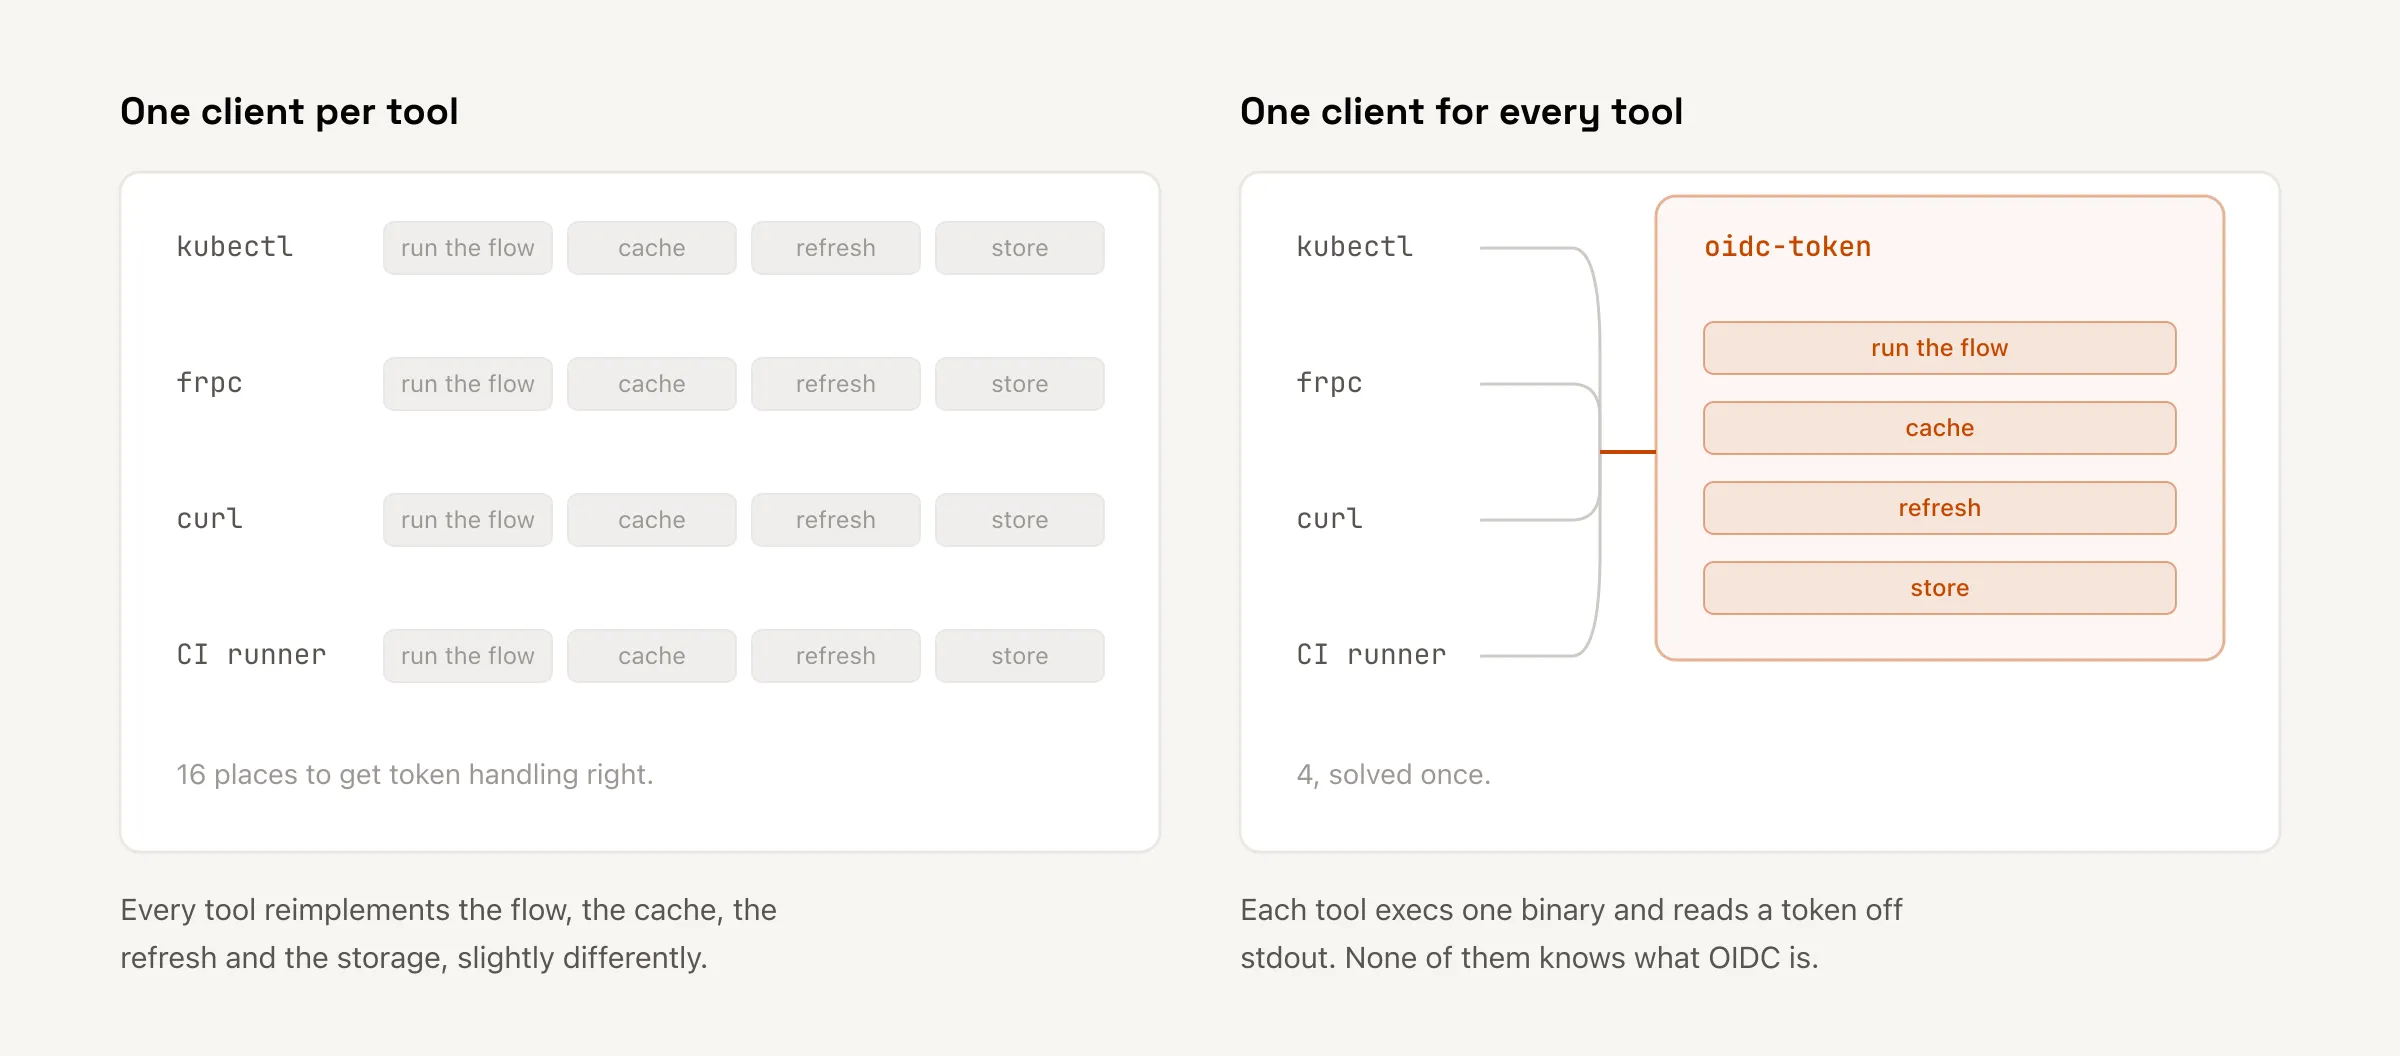
Getting a token is the easy part, a few lines against any OIDC provider. The work is everything around it: silent refresh so nobody is stuck re-authenticating, picking the right grant type depending on whether you are sitting at a laptop or running inside CI with no browser, and storing tokens sensibly. Doing that once, in one tool, is a lot less to maintain than doing it in every wrapper separately.
It also means any improvement lands everywhere at the same time: change how tokens are stored or refreshed, and every tool that calls oidc-token picks it up for free.
What we built on top of it
oidc-token-cli on its own is a credential provider. It does not know about tunnels, and it does not know about GitHub. Two things we built on top of it:
- A self-hosted tunnel setup using frp, where
oidc-token-clisupplies the identity and a smallcelpolicy layer decides what each tunnel is allowed to reach. Read that in Self-hosted tunnels with frp and CEL. - A broker that trades OIDC tokens for short-lived GitHub credentials, so CI stops carrying long-lived personal access tokens around. Read that in Killing GitHub PATs.
Both of those posts assume you already have oidc-token-cli producing tokens. This post is that assumption, written down.
Appendix: how it actually works
Discovery. On startup, the CLI fetches <issuer>/.well-known/openid-configuration. This tells it the authorization, token, and device authorization endpoints, along with what grant types and PKCE methods the provider supports. Nothing about the flow is hardcoded to a specific provider; anything that speaks standard OIDC discovery works.
Grant selection. With discovery data in hand, the CLI picks a grant automatically. If it can open a browser and the provider supports Authorization Code with PKCE, it uses that. If there is no browser available, for example over SSH or inside a CI container, it falls back to the OAuth 2.0 device authorization grant, printing a code and a short URL instead. You do not choose the grant yourself; the environment decides.
Cache keys. A cache entry is identified by the issuer and client ID, plus the scopes and audience when you set them. The same request reuses its cached token; a different request gets its own entry. Nothing more clever than that is needed.
Storage backend. Where an OS keychain is available, macOS Keychain or the Linux Secret Service API, the CLI stores tokens there instead of on disk. Where neither exists, it falls back to a plaintext file in the cache directory. This matters most on headless Linux hosts and inside containers, where there usually is no Secret Service running, and the CLI transparently drops to the file backend rather than failing.
Confidential clients and CI. For clients that are not public, the CLI supports --client-auth-method to authenticate the client itself alongside the user or workload. For CI specifically, it supports RFC 8693 token exchange: a CI job can present its own OIDC token (from GitHub Actions or GitLab CI, for instance) and exchange it for a token scoped to whatever the pipeline actually needs to call, without ever holding a long-lived credential.
None of this is exotic. It is the boring, correct version of the token handling every tool needs, in one place instead of scattered across each tool’s own config. Now we do not think about it again until it breaks, which so far it has not.